Thursday, December 31, 2009

A Soup Of Black-Eyed Peas

A Soup Of Black-Eyed Peas
and Collard Greens in Ham Broth

Soup is comfort food, and we can produce some really rich, full bodied and marvelously delicious soups in just minutes using a pressure cooker. Every household has a favorite recipe, and in the Southern states of the US, some of the best soups feature local ingredients like black-eyed peas and collard greens. This well known combination is steeped in history and has become a popular dish throughout the country.

For more interesting factoids about American traditions that are centered on Black-eyed Peas, see my article on the website. You might even get a smile or two about what some of my opinionated elderly kinfolk had to say about the quaint old Southern custom of eating black-eyed peas as a lucky New Year dish.

Oh yeah, and there's even another pressure cooker recipe featuring more black-eyed peas, too. A soup made in the pressure cooker can be cooked in minutes, but still taste like it has simmered all day. The foundation for any soup is a well seasoned broth or stock that compliments and enhances the flavors of all the ingredients.

So lets begin this soup with a ham broth. I always save the meaty ham bone and the pieces of the smoky outer rind in the freezer for making soup broth. I'm adding aromatics like onions, garlic and cilantro, and my seasoning are simple bay leaves and rosemary.

Oh, but the aroma... I wish you could smell how delicious this is as the scent fills my kitchen. It always reminds me of sitting around my grandma's big old farmhouse table as she ladled her homemade soup into those big old fashioned soup plates.

Did you know that our grandparents scrimped in hard times as well as good times, and all cooks were
frugal in those bygone days so there was very little kitchen waste. Quite literally, what we so casually toss in the garbage today, was routinely 'recycled' and every sort of vegetable and meat scrap was boiled down for the best tasting stocks and broth to make those wonderful soups we all remember. Another big side benefit, was getting a big meal of soup that was practically free. So, plan ahead and freeze those scraps for your next pot of soup.

Ready?

Thursday, May 28, 2009

Mexican Steak Sandwiches

If you're a foodie, you love a well stocked supermarket, and I could spend the whole day just browsing around the large and boldly colorful, sparkling clean Mexican Mercado (supermarket) in my California town. For those who are accustomed to the typical American grocery, the Tortilleria (the tortilla factory), the Taqueria (the food court) and Panaderia (the bakery) are a terrific bonus, but the CarnicerĂ­a (the meat dept) where meat does not come in plastic trays, is my first stop.

With so much to see, it can be somewhat confusing to a gringa like me. The courteous and helpful Mexican Carnicero (butcher) offers a huge selection of every sort of fresh USDA meat imaginable, all displayed in a gleaming meat case that must be a hundred feet in length. The customers cue up to select from a dizzying variety of cuts that will be wrapped up in butcher's paper for you. Even the cuts of meat may look unfamiliar because it is usually cut along the muscle groups, so there is less bone included... more bang for the buck! American butchers cut cross several muscle groups and take a crosscut section of bones along with the meat, which of course adds to the overall cost we pay.The first thing you'll notice is that Mexican Carne De Res (beef) is generally cut very thin, and its only about 1/4 inch thick. While you may not see large roasts or thick, juicy American style steaks, you can certainly ask the Jefe de Carniceros (Chief Butcher) for any special cut you'd like or preorder in advance.

Mexican cuts are thinner for two reasons; first, like most other countries, meat is not consumed as a high percentage of the diet in Latin America. Secondly, the wonderfully complex flavors of Mexican cuisine make the most of thin cuts of meat to stretch the food budget with traditional recipes that add delicious combinations of robust ingredients and piquant seasonings.

Another thing that you will notice in the CarnicerĂ­a is that the beef also looks leaner and less marbled than its fatty, corn fed American cousin, and the meat is not generally aged so its very bright red in color. The fat may have a yellow tint due to the vitamin A in grass from cattle that are raised on pasture rather than feedlots. Not only does the Carnicero do a painstaking job of removing most of the fat, but a leaner beef carcass is preferred... a plus if you're trying to eat healthier meals.


This makes Mexican beef an excellent choice for the pressure cooker where it benefits from moist heat cooking methods like braising, steam-roasting, poaching, or stewing. For this recipe, the cut of beef I bought at my local Mexican Mercado, was a Clod Steak. This is just one of the many different names for a Boneless Shoulder Steak, which can also be labeled as an English Steak, a London Broil, or Swiss Steak. It's a fairly cheap cut of beef from the chuck, that's the shoulder section of the steer between the ribs and the front chest (brisket). Because the big muscle groups in the chuck are heavily exercised and contain a lot of connective tissue, they are naturally very flavorful, but less marbled and tend toward toughness… perfect for the pressure cooker.

The pressure cooker, with its thick base does a very good job in caramelization, an important cooking trick that not only adds color, but also flavor, to many foods. Caramelizing onions is just cooking them for 10 to 20 minutes to get a nice caramel brown color which develops a rich, sweet flavor as the natural sugars within the onion begin turning to caramel. It's important to have all the onion pieces roughly the same size and shape so they cook evenly otherwise the smaller pieces will start to burn before the larger pieces can caramelize.

The onions will lose as much as two-thirds of their volume as the water within them evaporates. Stir them often as they begin to brown, and watch closely as they'll quickly go from light tan, to golden. The deeper the color; the richer the flavor, and with care, you can get a deep mahogany brown, but the danger of burning is high, so I'm happy with the golden brown.

Lightly brown the strips of beef in hot oil and then toss in the green stuff. If you are shopping at the local mercado, buy a mild Mexican chile pepper to add a zesty piquant flavor without too much heat, and you'll also need some peppery cilantro leaves add to the unique Mexican taste. Add other hot peppers if they appeal to your taste buds, or just stick with an assortment of colorful bell peppers if you're more timid.

The peppers will loose a lot of water during cooking, but that ads to the flavor of the au jus dipping sauce. When you remove the lid, divide the meat mixture between the sandwich rolls and top with a slice of Jack cheese while its still hot.

Taste the dipping sauce and adjust the flavors to your taste. I added more salt and a big splash of Mexican style jalapeno hot sauce before spooning it into small ramekins on each serving plate.


Monday, May 4, 2009

Honey Glazed Herbed Carrots

Don't use your Pressure Cooker to boil veggies;

STEAM them!

Vegetables are a great match for the pressure cooker. Since they are steamed, not boiled, they retain more nutrients and the faster release methods keep the bright colors and texture. All that translates into wonderful taste and flavor, and as a bonus, of course, they only take a few minutes to cook.


I like to cook vegetables in the smallest size pressure cooker possible because it will pressurize and depressurize much faster. Also, the newer brands that only need a 1/2 cup of liquid will really speed the process, and the less time foods are exposed to heat, the better. This is always an important consideration when cooking vegetables. If you have a 4qt pressure, which is often sold as part of a set, now is the time to use it.

Steamed baby carrots in a handy accessory pan included with most pressure cookers.
A perforated steaming tray is included with most pressure cookers, and it's a very valuable accessory to have in your cupboard. Test the carrots for doneness; they should be tender, but not soft or mushy. Pour out the water and wipe the inside of the pressure cooker dry. You'll want to use real butter for this dish because margarine contains water that will prevent the honey and herbs from sticking and coating the carrots.

I use a medium high heat to get a nice glaze on the carrots as they get well coated by the honey mixture. Stir frequently, gently moving the carrots around to get them completely covered with the glaze. Keep stirring as the glaze thickens and the little bits of herbs start sticking to the carrots. When it begins to look like there is less glaze in the pan and you can see the bare metal, then the glaze is set. When you dish the carrots, pour any remaining honey mixture over the top.
Sweet and tender enough to appeal to children, the scent of herbs and flavors will tempt adults as well.


Honey Glazed Herbed Carrots

A quick and tantalizingly sweet way to serve carrots with just a hint of dill. It's sweet and savory at the same time, and the aroma of thyme and dill will tickle your taste buds.

1 lb fresh baby carrots, or carrots cut to a similar 2 inches x 1/2 inch thickness
1/2 cup honey
1 teaspoon dried dill
1 teaspoon dried thyme
Salt to taste
2 tablespoons butter, not margarine

Add 1/2 cup water to the pressure cooker. Wash the carrots and place them in a steamer tray. Place the tray in the cooker, using a cooking rack if needed to elevate it above the water level. Lock the lid in place. Bring to 15psi over high heat, immediately reduce the heat to the lowest possible setting to stabilize and maintain that pressure. Cook 3 minutes. Remove from heat and use the quick release method before opening the lid. Pour off the water and wipe the pressure cooker dry. Melt the butter in the pressure cooker over medium heat. Add the dill and fry a couple of minutes or until the aroma if released. Add salt and honey, stirring to blend. Add the cooked carrots and saute, turning gently until they are well coated with the honey mixture and heated through. Serve hot, spooning any remaining honey butter over the carrots.


Try this dish and let me know how you like it.

Tuesday, March 10, 2009

Corned Beef and all the Fixings

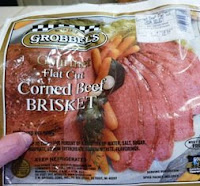
Corned beef and cabbage is one of my absolute favorite meals. What we think of as Irish fare, corned beef and cabbage is a special feast for some people who only cook it for a St Patrick's Day dinner, but both St. Paddy's Day celebrations and corned beef, are actually American inventions, and also known as the traditional New England Boiled Dinner. A corned beef -- and the correct term is indeed "corned beef", not "corn beef" -- requires moist cooking, so it's perfect for the pressure cooker.

A corned beef is beef that has been pickled or cured. The word "corn" comes from an Old English usage that refers to a process that dry-cured meat in the days before refrigeration by packing them in coarse salt pellets, or “corns” of salt. "Corn" describes the size and shape of the coarse rock salt that is traditionally used for brining because it resembled a kernel of grain. If you live in the UK, this would be a Corned Silverside or "salt beef".

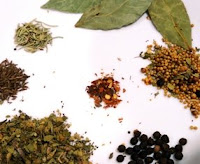
In the US a corned beef is typically a brisket, rump or round roast that is pickled or brined in salt water instead of dry salt cured, but the name "corned beef" remains. Usually a little packet of picking spices in included to give corned beef that distinctive flavor. If the spice packet is missing, you can find pre-mixed pickling spices in the spice aisle at most supermarkets. If you want a spicier taste, you can also make your own blend, and here's what I use:
Miss Vickie's Corned Beef Spice Blend

1 teaspoon whole black peppercorns
1 teaspoon whole mustard seeds
1/4 teaspoon whole celery seeds
1/2 teaspoon whole fennel seed
2 bay leaves
pinch of dried crushed red pepper flakes
2 - 4 whole cloves
4 cloves crushed garlic
Tie all the spices in a square of cheese cloth, or put them in a large tea-ball for easy removal.

The brisket can be the Flat or Plank Cut that is leaner and has the distinctive grain we see in the slices. The Point Cut is a rounder, thicker cut with more fat in it and may be a little more expensive. Either cut will shrink by about a third during cooking. Be sure to add additional quantities if you plan to have leftover corned beef to use in recipes like stovies, bully beef stew, Ruben sandwiches, or hash.

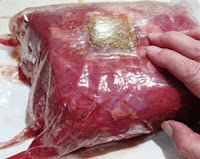
Place the whole shrink-wrapped brisket in a large colander in the sink, then cut it open and remove the packaging. Rinse the meat thoroughly to remove the salty brine. The salt brine draws out the blood in the meat. Do not use the brine in the package to cook with.

Cooked in a regular pot, a corned beef takes about 4 hours, but in the pressure cooker, the cooking time is cut down to only about 50 minutes. Corned beef can be cooked a day in advance, refrigerated, and reheated by steaming in the pressure cooker for about 6-8 minutes. A corned beef is usually boiled to draw out the salt and fat, you can use water, but I like Guinness stout to add flavor... and because it sure goes good with a big corned beef sandwich the next day.

After the cooked beef is fully cooked and fork tender, I remove it from the pressure cooker and pour off most of the cooking broth. Using a large steamer basket to hold all the hard root vegetables, I put the cabbage wedges on top. This allows the vegetables to steam rather than boil in the greasy, salty cooking broth, and I know they will be tender, but not too soft or mushy from boiling or overcooking.

Some people like the taste of the vegetables cooking in the meat broth, and that's a matter of preference, so you can use either method. If this suits your palate, can ladle some of the broth into a bowl to be passed at the table and drizzle a few spoonfuls over the corned beef and veggies as desired.

You can stretch your food dollar by buying a smaller corned beef and adding a wider assortment of root vegetables such as rutabagas, turnips, parsnips, sweet potatoes and onions. You also switch from cabbage to kale or Brussels sprouts. The leftovers can be mixed and mashed for new dishes like Dutch Whip, or make Irish Potato Farl, Colcannon, Irish Champ, or Kale Colcannon.

Thursday, February 19, 2009

Penny Pinchers Navy Bean Soup

The U.S. recession is putting a severe economic pressure on every household. As in the past, when hard times, a cheap meal looks very appealing and nothing is better for a budget than a comforting bowl of homemade soup!

To make a frugal soup from leftovers, start with making a flavorful stock as the base. Smoked pork neck bones are often used to add a robust flavor to beans, and they are very cheap, too. Unlike ham hocks, another popular choice, this meat doesn't have a great deal of waste, and there's much less fat, and no useless rind of pigskin. Smoked pork neck bones have loads more meat, and plenty of bone and connective tissue, the key elements to making a rich tasting soup.

Inexpensive ingredients like onions, garlic, peppers and cilantro add taste and aroma, and the scent of rosemary and thyme fills the air. Dried beans will go a long way to stretch your food budget, and the yield is incredible so I'm only using 1 cup for my cheap soup.


I've added only enough water to cover most of the ingredients without totally drowning everything. In this case I used a little more the 2 quarts which gave me about 18 cups of soup.

My smoked neck bones cooked for 35 minutes plus the natural release which will finished the cooking and give me meat that is just about falling off the bone. I'll set them aside to cool a bit so I can pick all the meat off.

Now I'm going to add the Navy beans. These are one of the most popular of dried beans because they are so creamy tasting. I've picked through these beans and they soaked for four hours. Into the pressure cooker they go, and they should be covered by at least 2 inches of that meaty broth for a good soup. Add more liquid if needed. Back under pressure for 12 minutes they go, and I'm using the natural release so the skins don't split.

While the beans are cooking, the meat is cool enough to handle. Its easy to pull off most of the meat with a fork. Use your fingers to get every delectable morsel for the soup. The penny pincher trick I learned from my grandma was to chop most of the meat into very small bits and shreds, but also leave a few large pieces so it fools the eye into seeing just the bigger chunks. I ended up with slightly less than 2 cups of meat.

When the beans are done, they are so tender that you should be able to mash one in your fingers. Now I'm going to use a hand blender to partially puree the broth and some of the beans. The starch from inside the beans will thicken the soup and give in a creamier, richer texture. You can also do this in a food processor or blender, but take care not to over do it. I'm careful to leave a fair amount bigger veggie pieces, and some whole beans to add more substance to my frugal soup. Finally, add the chopped meat back into the soup and heat through.
Related Posts with Thumbnails